Centerpieces etiketine sahip kayıtlar gösteriliyor. Tüm kayıtları göster

29 Mayıs 2013 Çarşamba

2011 Clever Halloween Centerpieces Ideas

Use these centerpiece ideas as inspiration for your next Halloween party or as festive additions to your home to add some fright to your holiday table .
i hope you like it .. Enjoy  !!


Halloween Glass Vases 

Glass block vases become one-of-a-kind Halloween centerpieces with die cuts and spooky scrapbook paper (available at crafts stores). To make, use spray adhesive to attach the papers; (spray the back of the paper, not the glass, to avoid streaks). Place sand and tapered candles inside the vase for a haunting glow. 
Editor's Tip: Use clear plastic blocks in lieu of glass vases. Be sure to nix the candles or opt for battery-powered versions.


Black and Orange Halloween Candles 

Wrap decorative scrapbook paper around large orange and black candles to create this simple Halloween centerpiece. An orange table runner makes the black candle pop, overturned black bowls add height to the decoration, and black spiders and white Halloween candies add creepy-crawly fun at the base. 
Editor's Tip: Be sure to keep an eye on how fast your candles burn, and trim scrapbook paper accordingly.


Raven Urn Centerpiece 

You need only a few household items and a little nature to create this haunting-yet-simple Halloween centerpiece. Gather knotted, rustic sticks from your yard or neighborhood to place in a basic urn, and add bits of moss to get the fright just right. Use free clip art to trace and cut out ominous black ravens from construction paper -- the finishing touch for this Halloween centerpiece.


Candleholder Goblets Display 

Thrift-store glasses become centerpiece-ready with a coat of black spray paint. Choose textural goblets for the most detail, set them upside down to spray-paint, and tape a few to preserve the tops. Touch up any edges with a black permanent marker after the goblets dry. Note that after decorating the goblets they are meant for display only. 
Editor's Tips:
Use sand to raise your votives to desired height.
Place the goblets on a black tray or a mirror embellished with spray paint to make the centerpiece both cohesive and portable.


"Boo" Embroidery Hoop Centerpiece

Basic embroidery hoops set a spooky scene at your Halloween table. To make, stretch black costume fabric or lace through the painted hoops; trim extra fabric. Next, spray-paint planters for bases, then add enough florist's foam inside to secure a painted dowel through the middle. Finish with a square of black-and-white patterned paper atop the planters and a hauntingly fun message spelled out in painted wood letters. Hot glue can help secure the dowels and wood letters.


Ribbon Spool Stackers 

Colorful spools of ribbon display equally eye-catching desserts. Place scallop-edge die cuts (available at crafts stores or cut from a die-cutting tool) between the ribbon spools with a touch of adhesive to ensure stability. Top with a decadent treat for a sugary-sweet Halloween centerpiece. 
Editor's Tip: Arrange the spools in a cluster around an accent piece, such as a colorful vase, or in a straight line on a table runner to maximize creativity.


White Pumpkins on Black Stands

Pumpkins painted white and covered in glitter stand out when placed on stark black stands. Use double-sided tape or an adhesive spray to get just the right amount of shine for this glitzy Halloween centerpiece.


Recycled Halloween Centerpiece 

Scrapbook papers and floral accents are all it takes to "upcycle" yesterday's tin cans into a "green" Halloween centerpiece. Standard- and economy-size tin cans work well for this craft, although the more varied the sizes, the more intriguing the display. Wrap with scrapbook paper or add die-cut scenes or stickers as desired. 
Editor's Tip: Keep the cans for next year, or give them away to guests as simple mementos of a frightful night.


Ghost Book Pop-Ups

A stack of old books forms the stand in this spooky centerpiece. To make, cut two basic ghost shapes from pages in the middle of a book, leaving the bottoms attached to their pages. Hold up each ghost with a touch of tape. To complete, use a hole punch or marker to make eyes for this haunting centerpiece.


Chalked Skeleton Centerpiece

Spray-paint Halloween props with black chalkboard paint, then outline them with chalk for frightfully aged flair. Fill the cauldron with a decorative bottle, handpicked beverage, or a tasty Halloween treat.

Quick Halloween Centerpieces Ideas 2011

Use these centerpiece ideas as inspiration for your next Halloween party or as festive additions to your home to add some fright to your holiday table .
i hope you like it .. Enjoy  !!

Jack-o'-Lantern Halloween Centerpiece

Miniature jack-o'-lanterns make a big impact when arranged on footed cake stands and displayed on a vintage tray. Place battery-powered candles inside each hand-carved pumpkin, and let your guests enjoy the glow.


Book-and-Pumpkin Centerpiece 

Books, pumpkins, and gourds compose this Edgar Allen Poe-worthy Halloween centerpiece. Use black books, or craft quick book covers with black construction paper. 
Editor's Tip: Incorporating raven accents on items such as place cards will make the spooky Edgar Allen Poe vibe even more apparent.


Pumpkins in Glasses Centerpiece 

This centerpiece with pumpkins and flower glasses plays a trick on the eyes, as miniature pumpkins placed in water-filled glasses appear to float in the water. (Spoiler: They're just too big to sink all the way to the bottom.) Bright orange flowers resting in a glass and small, shallow bowl add more orange to this Halloween centerpiece. 
Editor's Tip: To add more color, replace water with black and orange candies or smooth black stones.

Black-and-Orange Skeleton Candle Display

 These tall glass votive holders -- complete with a black jelly bean base -- hold black and orange candles. Spooky skeletons hang on the outside of the votive holders, ensuring an extra-haunting glow when the candles are lit.


Halloween Gourd Centerpiece 

Use rugged old cabinet legs as eye-catching bases in this Halloween gourd display. Elevating some gourds and leaving others on the table, as well as varying the size of gourds, adds quirkiness to this Halloween centerpiece. 
Editor's Tip: Tie ribbon onto the bases in knots or bows to add quick bursts of color.


Floral Jack-o'-Lantern Halloween Centerpiece

A smiling jack-o'-lantern becomes the perfect Halloween vase when you place a container of water and flowers inside. A simple carving (or scraping) that forgoes the typical wide mouth will help the inside container stay hidden. Use a white pumpkin and orange flowers for extra pop.


Pumpkin-and-Candle Halloween Centerpiece 

Nuts, pumpkins, and a large candle dress up a small woven mat in this simple-yet-sophisticated Halloween centerpiece. Fallen leaves tucked into the display add natural fall flair to the decoration. 
Editor's Tip: For a more kid-friendly decoration, use candies, painted pumpkins, and a battery-powered candle so curious fingers don't find a flame.


Pumpkins on White Dishes

Simple white dishes display multicolor pumpkins in this elegant Halloween centerpiece. Use footed bowls, small plates, and candlesticks at varying heights to create an eye-catching display.


Silver Skull Centerpiece

For a centerpiece with both spook and glam, spray-paint a plastic skull silver. Use black feathers to create a to-die-for boa around the "head of the table." Place the skull on a black raised stand or footed dish for a lively Halloween decoration.


Pumpkin Platter Centerpiece

A plain white platter becomes a Halloween centerpiece with a handful of scattered miniature pumpkins and fall accents. The nonlinear look is key with this decoration, so assemble pieces randomly along the platter for an effortless, relaxed look.


Large Pumpkin Bouquet Halloween Centerpiece 

Use a large, tall pumpkin to create this picturesque Halloween centerpiece. Stuff a variety of flowers, fillers, and greenery in a vase inside this simple, hollowed-out pumpkin. 
Editor's Tip: To add a bit of festive fun, tuck tiny Halloween decorations, such as plastic spiders or spooky stir sticks, into the arrangement.


White Pumpkin Vases

White pumpkins double as vases and make for a spook-free Halloween centerpiece. Leaves, orange flowers, and cattails are tucked into a hidden vase or container in the hollowed-out pumpkins.

2011 Clever Halloween Centerpieces Ideas

Use these centerpiece ideas as inspiration for your next Halloween party or as festive additions to your home to add some fright to your holiday table .
i hope you like it .. Enjoy  !!


Halloween Glass Vases 

Glass block vases become one-of-a-kind Halloween centerpieces with die cuts and spooky scrapbook paper (available at crafts stores). To make, use spray adhesive to attach the papers; (spray the back of the paper, not the glass, to avoid streaks). Place sand and tapered candles inside the vase for a haunting glow. 
Editor's Tip: Use clear plastic blocks in lieu of glass vases. Be sure to nix the candles or opt for battery-powered versions.


Black and Orange Halloween Candles 

Wrap decorative scrapbook paper around large orange and black candles to create this simple Halloween centerpiece. An orange table runner makes the black candle pop, overturned black bowls add height to the decoration, and black spiders and white Halloween candies add creepy-crawly fun at the base. 
Editor's Tip: Be sure to keep an eye on how fast your candles burn, and trim scrapbook paper accordingly.


Raven Urn Centerpiece 

You need only a few household items and a little nature to create this haunting-yet-simple Halloween centerpiece. Gather knotted, rustic sticks from your yard or neighborhood to place in a basic urn, and add bits of moss to get the fright just right. Use free clip art to trace and cut out ominous black ravens from construction paper -- the finishing touch for this Halloween centerpiece.


Candleholder Goblets Display 

Thrift-store glasses become centerpiece-ready with a coat of black spray paint. Choose textural goblets for the most detail, set them upside down to spray-paint, and tape a few to preserve the tops. Touch up any edges with a black permanent marker after the goblets dry. Note that after decorating the goblets they are meant for display only. 
Editor's Tips:
Use sand to raise your votives to desired height.
Place the goblets on a black tray or a mirror embellished with spray paint to make the centerpiece both cohesive and portable.


"Boo" Embroidery Hoop Centerpiece

Basic embroidery hoops set a spooky scene at your Halloween table. To make, stretch black costume fabric or lace through the painted hoops; trim extra fabric. Next, spray-paint planters for bases, then add enough florist's foam inside to secure a painted dowel through the middle. Finish with a square of black-and-white patterned paper atop the planters and a hauntingly fun message spelled out in painted wood letters. Hot glue can help secure the dowels and wood letters.


Ribbon Spool Stackers 

Colorful spools of ribbon display equally eye-catching desserts. Place scallop-edge die cuts (available at crafts stores or cut from a die-cutting tool) between the ribbon spools with a touch of adhesive to ensure stability. Top with a decadent treat for a sugary-sweet Halloween centerpiece. 
Editor's Tip: Arrange the spools in a cluster around an accent piece, such as a colorful vase, or in a straight line on a table runner to maximize creativity.


White Pumpkins on Black Stands

Pumpkins painted white and covered in glitter stand out when placed on stark black stands. Use double-sided tape or an adhesive spray to get just the right amount of shine for this glitzy Halloween centerpiece.


Recycled Halloween Centerpiece 

Scrapbook papers and floral accents are all it takes to "upcycle" yesterday's tin cans into a "green" Halloween centerpiece. Standard- and economy-size tin cans work well for this craft, although the more varied the sizes, the more intriguing the display. Wrap with scrapbook paper or add die-cut scenes or stickers as desired. 
Editor's Tip: Keep the cans for next year, or give them away to guests as simple mementos of a frightful night.


Ghost Book Pop-Ups

A stack of old books forms the stand in this spooky centerpiece. To make, cut two basic ghost shapes from pages in the middle of a book, leaving the bottoms attached to their pages. Hold up each ghost with a touch of tape. To complete, use a hole punch or marker to make eyes for this haunting centerpiece.


Chalked Skeleton Centerpiece

Spray-paint Halloween props with black chalkboard paint, then outline them with chalk for frightfully aged flair. Fill the cauldron with a decorative bottle, handpicked beverage, or a tasty Halloween treat.

27 Mayıs 2013 Pazartesi

New Simple Christmas Centerpieces Ideas 2012

Get inspired with these beautiful easy arrangements that will wow your family and guests.


Think Small 

Instead of one gigantic centerpiece, consider making several smaller bouquets for the table. A silver ornament and sprigs of evergreen are nods to the holiday season, but this idea is versatile: Flowers could be any color or type that complements your china and table linens.


Sparkling White 

Capture the look of a snowy Christmas with an all-white centerpiece and table decor. The secret to a beautiful monochromatic table setting is using a variety of materials. Here, the table boasts everything from elegant white orchids to dishes and flatware in shades of ivory. 

Editor's Tip: Texture often assumes greater importance in a monochromatic setting. The ribbed vases, pressed-glass stemware, and embroidered tablecloth all add interest to the scene.


Flowers and Votives 

A block of soaked florist's foam holds this arrangement in place. Three glass votive cups were set on top of the foam -- making it easy to change the candles as needed. Curly twigs inserted into the foam hold the glass cups in place. Next, flowers and greens are arranged around the sides of the foam, draping down to the tabletop.


Gilded Fruit 

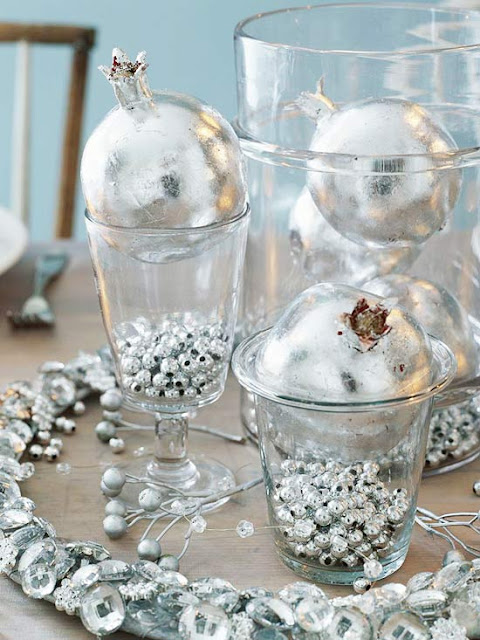
Whether silver, gold, or copper, metallics can make a table spectacular when displayed in clear glass containers. Look for gilded artificial fruits (these are pomegranates) at a crafts or floral supply store, or make your own (see link below). Mix in a few small- and medium-size beads, garlands, or berries for added glimmer.


Switch It Up 

Centerpieces usually run the length of the table. For something different, keep the centerpiece in the middle of the table, but stretch it across the width instead. Here, evergreen boughs drape across the table horizontally and are accented with pretty red flowers and white berry sprigs.


Low Glow 

Real or artificial magnolia leaves (we gave ours a quick spritz of gold paint) are set on a flat platter to form the foundation for an arrangement of holiday ornaments and tiny berry sprigs. Easy and impressive!


Serving Up Sophistication 

A pair of stacked cake plates dressed with evergreens, glass balls, pinecones, and red berries makes a sophisticated, no-fuss centerpiece.


All Boxed Up 

A rustic wooden toolbox lets a holiday centerpiece spread out. Stand pillar candles on supports, such as candleholders or even soup cans, so they are set at different heights. Next, add bowls or low containers of damp florist's foam and arrange the greenery. A sweep of garland and a cardinal's nest add a final touch. 
 Editor's Tip:
Be sure to keep the candle flames a safe distance from the greenery and other elements.


Fresh Arrangement 

To make this fresh floral centerpiece, fill a silver ice bucket with soaked florist's foam. Insert white pine branches so they arch down and touch the tabletop. Next, insert groups of fresh flowers we chose hydrangea and roses along with a few pinecones attached to sturdy wire picks for stability.

2012 Ideas For Christmas Centerpieces : Easy To Do

Get inspired with these beautiful easy arrangements that will wow your family and guests.


White Hyacinth Holiday Centerpiece 

This centerpiece filled with seasonal, natural elements is versatile enough for any holiday occasion. Simply fill a large, low bowl with boxwood, pinecones, and white hyacinth.


Sugar-Coated Fruit Centerpiece 

There's nothing sweeter than this sugary holiday centerpiece. Fill an ebony wood compote with artificial snow. Embellish with wax sugar-coated pears, plums, and grapes.


Winter White Holiday Centerpiece 

A holiday table is even cozier when layered in winter whites. To make the runner, cut felt by the yard to the needed length and 18-24 inches wide. Trace halfway around a drinking glass at the ends of the runner to create scalloped edges; cut out with scissors. Embellish with punched scalloped-edge circles. On smaller sections of felt, punch more scalloped-edge circles, and wrap felt around oversize glass vases. Insert candles for a soft, wintry white glow, and scatter felt cutout snowflakes across the table runner.


Freshen with Botanicals 

Elevate a humble wooden box to Christmas-centerpiece status. Start by lining the box with dry florist's foam to anchor evergreen sprigs. Attach citrus fruits (lemons, oranges, limes) to florist's picks and tuck into the greenery. Add interest by cutting some of the fruits in half or adding decorative details. 

Editor's Tip: Make orange pomanders by using a large needle to poke holes into the orange. Push the stems of whole cloves into the holes.


White Gold 

Large white hydrangea blooms fill a white pitcher (or try a bowl!) with fresh floral splendor. We added seeded eucalyptus leaves and a few stalks of white snaps and filled in with golden holiday ornaments on wires. Fresh green and red apple slices surround the neutral centerpiece with a bright border.


Under Glass 

A clear glass cloche on a platter or tray plays host to a few perfect decorations: one stunning holiday ornament, a few sprigs of evergreens, and a single perfect rose. Keep the rose fresh by inserting the stem into a florist's water tube, which can be concealed under the greenery.


Front and Center 

This tabletop take on pomander balls makes an eye-catching Christmas display. Simply soak florist's foam balls in water and cover with red carnations. Place the finished balls atop white vases or urns placed in a row in the center of your table.


Glad Tidings 

For this organic centerpiece, insert a chunk of wet florist's foam into the bottom of the urn and fill with water. Cut each gladiolus stem into three or more sections, with at least two florets on each section. Insert the cut ends into the wet foam, turning the container as you work. Add filler around the base and up through the flowers (we used green hypericum berries and waxflower foliage).


Relaxed Holiday Brunch 

This setting for brunch reflects a relaxed country French approach to decorating. The dining room features a red-and-white color scheme as a backdrop.


Little but Lasting 

Decorate your table with small arrangements of alstroemeria and birch twigs. We added a filler of beige rice flowers and long, green amaranth seed heads. Find similar shaped flowers at your local florist or grocery store. Or clip twigs from your yard for a personal touch.